Lightweight Re-Usable UPOD
New DEMOSubstrate Replacements
Long wall 57 1/4” x 32 1/2”
Short wall 27 3/4” x 32 1/2
Long Wall Niche Cutout
Top Right Corner = 11 1/2" from right edge, 5 1/4" from top edge.
Top Left Corner = 27 1/2" from right edge.
Bottom of Niche = 15 1/4"
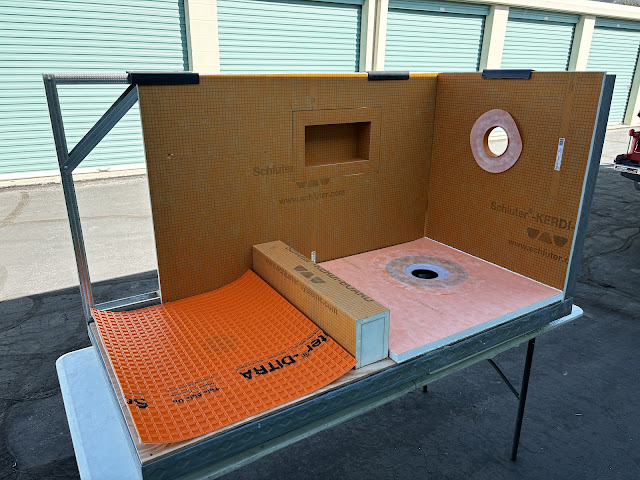
This model doesn’t allow to actually recess with sister trusses, I keep 2 pieces of 3/4” OSB with me to demonstrate what this would look like. Rest shower tray on base ply/RE-Fleece. Rest 1 piece of 3/4” OSB up to shower tray. Explain that this would be the elevation if I had been able to successfully recess the floor. Use flyer or PPT to explain how floors are/can be recessed to bring to this point. Other piece of OSB may need to be used for build up - depending on chosen shower configuration.
STANDARD UPOD FRAME DIMENSIONS
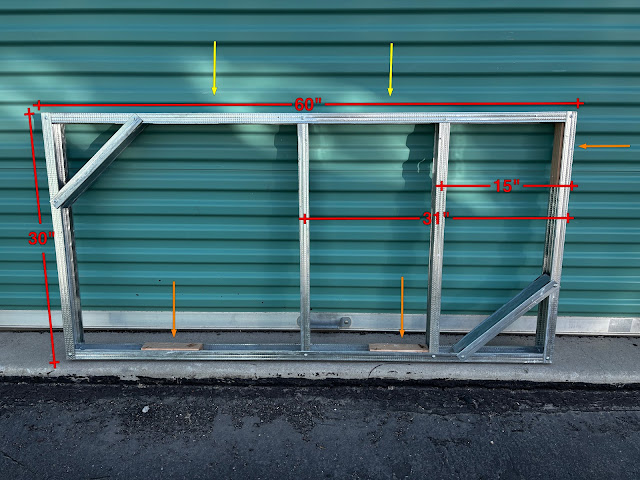
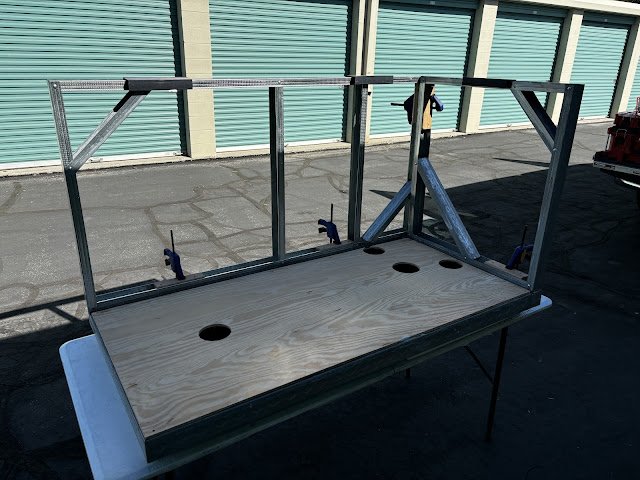
I framed the stainless steel stud UPOD following the same dimensions of the dimensional lumber UPOD (30” x 60” base with 30” high walls). Instead of fastening with screws, the stainless steel UPOD assembles with clamps, and substrates are secured with KERDI-Line tileable grate spacers.
ASSEMBLY
I rest my UPOD-E base on KERDI-Board 2” pieces (left over from part 2 workshop). This (1) catches the wall substrates when I slide them into the base piece and, (2) allows the clamp that secured the wall to hug the base piece.
Push the steel wall framing tightly to the inserted substrates (gypsum or KERDI-Board) and trap them in place, then clamp walls to the base. UPOD-E assembly will require 4 clamps and 3 tileable grate spacers.
BASE
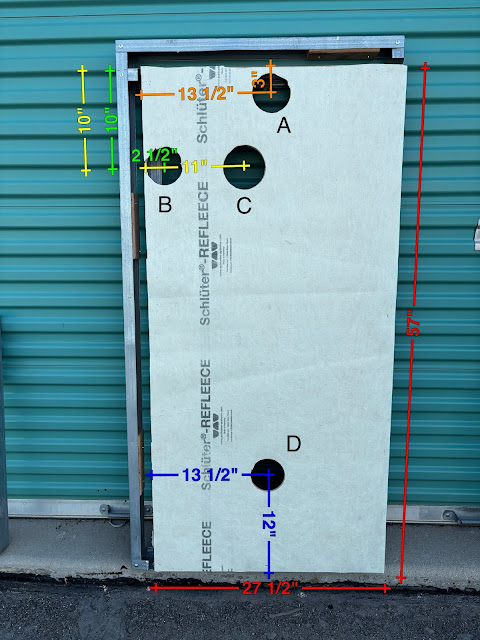
Use 5/16” (preferred to keep lightweight) or 3/8” plywood as base.
A, B and D are 4” holes. C is 4.5”.
A - Demonstrate KERDI-Line or VARIO Wall install
B - Demonstrate VARIO off-set Wall install
C - Demonstrate KD2/3 or KDAR install
D - Demonstrate F-Drain or KERDI-Line/VARIO entry placement install
A - Demonstrate KERDI-Line or VARIO Wall install
B - Demonstrate VARIO off-set Wall install
C - Demonstrate KD2/3 or KDAR install
D - Demonstrate F-Drain or KERDI-Line/VARIO entry placement install
DOTTED GREEN LINE is where I will add two stainless steel studs with long flat side facing existing stud, so when I slide drywall or KERDI-Board into the slots, the studs will hold the substrates more secure than my current configuration (with just cut slot without second securing stud).
ORANGE arrows indicate placement for 1x3 stud block for support when clamping to base.
YELLOW arrows indicate slots cut in top to hold hold U-channel that slides in and secures wall substrate.
Use chop saw or Skillsaw to cut KERDI down to 30” long roll. Remaining 10” can be used as 10” banding. Use same saws to cut Re-Fleece down to 27 1/2”. Sample out short end or discard. Use Re-Fleece to protect 3/8” base ply. I staple mine down at 4 corners and pull staples when I clean to re-use.


