Posts

Pleasant Valley Hunting Preserve

Image
Join us for a day in the field hunting pheasants at Pleasant Valley Hunting Preserve! An Orvis endorsed hunting ground. Hunts begin at 9:00 AM.   Arrive 30 minutes early to sign release forms and attend the safety meeting. Pleasant Valley Hunting Preserve 3733 W 10000 S Myton, UT 84052   pvhunting.com   RSVP (required) Chris Hill 801-834-0744 chill@schluter.com   IMPORTANT Drive is a little over two hours from Salt Lake Valley. Winter driving conditions can be hazardous through both Parleys/Strawberry and Highway 6/Indian Canyon routes.  Plan additional time if needed. Bring your own gun(s) and shells. Wear hunter/safety orange (hat, vest or jacket). PVHunting gear also available to purchase from lodge. Bring drinks/snacks to fuel while hunting. Hunts could cover up to 5 miles walking. Dress warm. Fall weather can turn cold fast, and winter speaks for itself! There are 5 birds per person. Birds will be released the morning of the hunt. Fly away birds are goners...

Installation of Glass Tile over a Sealed Shower System

Image
The Schluter-Shower System is a waterproofing system for showers, steam showers and tub surrounds. It is used to create a waterproof and vapor tight enclosure prior to setting the tile. If the KERDI is installed properly (i.e., Schluter ALL-Set/Schluter SET or non-Schluter branded unmodified thinset thin-set mortar with 2" overlaps, etc.) in conjunction with the KERDI-DRAIN, KERDI-LINE and VARIO, then Schluter Systems will guarantee a waterproof and vapor tight enclosure.  However, Schluter-Systems cannot guarantee the performance of the glass tile over KERDI. The KERDI membrane features a fleece webbing that will accept a bond to Schluter modified and non-modified mortars, and any commercially available premium grade non-modified thin-set mortars used to install tile. Furthermore, we recommend relatively stable backings for KERDI in our Handbook to promote successful tile installations. We know that ceramic, porcelain, and stone tiles can be bonded with ANSI A118.1 unmodified ...

Helpful Tools for DITRA-Heat Repair

Image
Below is a list of tools that are necessary and extremely helpful for wire repairs.   Schluter Splice Repair Kit | DITRA-Heat E-HK-SK https://www.schluter.com/schluter-us/en_US/Floor-Warming/Cables/Schluter%C2%AE-DITRA-HEAT-E-HK-SK/p/DITRA_HEAT-E-HK-SK   Pictured below RIGHT If not stocked at distribution, these can be ordered direct from Schluter. Use this for repairing a damaged cold splice or end splice. Schluter Wire Repair Kit | DITRA-Heat E-HK-RK https://www.schluter.com/schluter-us/en_US/Floor-Warming/Cables/Schluter%C2%AE-DITRA-HEAT-E-HK-RK/p/DITRA_HEAT-E-HK-RK   Pictured below LEFT If not stocked at distribution, these can be ordered direct from Schluter. Use this for repairing a damaged section of a heat wire. KLEIN Tools ET600 Multimeter Megohmmeter Insulation tester. 4000 Ohms resistance. This device can do tests 1, 2, 3 and 4 (sensor).  https://a.co/d/9OqsLjn TEST 1 - Setting second from right (WiFi/tone symbol). Connect a clip to each heat wire l...

TROBA-Level Pedestals | Install Points and Perimeter Restraint

Image
Perimeter restraint is required for TROBA-Level pedestal assemblies. Below are images taken from a condominium project in South Lake Tahoe (Tahoe Beach Club). A 1/4" thick steel plate was tacked to the posts of the deck handrail system.  Below is a completed edge. The side of the deck has not yet had the steel plate tacked to the handrail posts, so you can see the 2" thick concrete pavers and the pedestals prior to completing the perimeter containment. Individual TROBA-Level paver supports, and their heights/max stacking heights listed in below table. Bottom of this post contains links to the TROBA-Level Data Sheet (with installation instructions), installation videos in English and Spanish, and the TROBA-Level Estimator Tool. All substrates must be structurally capable of supporting the anticipated loads. Install extra paver supports if heavy items (e.g., hot tubs, planters, etc.) will be placed on top of the tile paver surface. Insulation must have a compressi...

Selecting the right Mortar

Image
THE SHORT ANSWER  Use Schluter ALL-Set! We control the formula and the technology.  We know it will work over and under our products. Thus the pun behind the name - you are ALL-Set ! THE LONG ANSWER Schluter products are impervious. Tile is impervious. What does that mean? Impervious means, “ not allowing fluid to pass through” . These surfaces don’t breathe. Schluter has stated for years that an ANSI A118.1 non-modified mortar must be used when installing our product (with the exception of DITRA over wood). We took that stance because testing showed that we had better and more consistent curing results with a non-modified mortar than with a modified mortar. Polymers are designed to slow the cure down. With tile formats getting larger and when installed over impervious membranes, when a modified mortar is used there is no control over the rate of cure between those impervious materials. It could be anywhere from 30 to 60 days (maybe longer) before a full cure is achieved. Th...

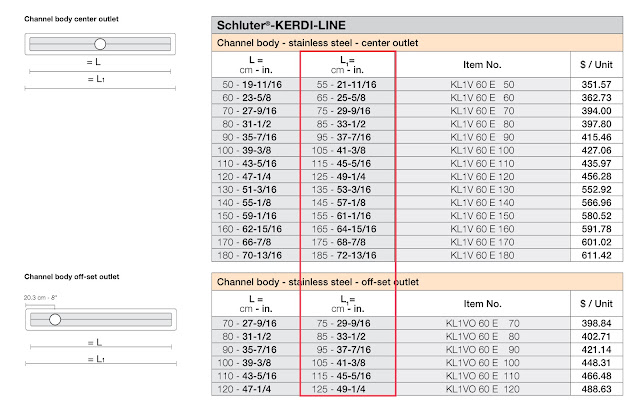
How to select KERDI-Line Channel Body/Grate Size

Image
Because KERDI-Line channel bodies are made out of stainless steel, they cannot be cut (nor extended). Thus it is important to understand how to select and maximize the correct length of drain and grate combination for your respective project. CHANNEL BODY SELECTION There are two columns in the price book associated with selecting a channel body. The first column (L) references the length of the drain grate, or the inside to the inside of the channel body. The second column (L1) references the outside flange to the outside flange measurement. Use L1. EXAMPLE : I would like a line drain along the wet wall (plumbing wall) of my shower.  From wall to wall (substrate to substrate…not stud to stud), the length is 48”. From column 2 (L1), 49 1/4” is too big, so I would choose 45 5/16”.  The item number to the right is KL1V 60 E 110 . The channel body will come with the below items needed to complete installation and waterproofing. GRATE SELECTION Once the item number has been identif...

Removing tile over DITRA-Heat when repair is necessary.

Image
Occasionally it may be necessary to access a wire or sensor for repair after the tile has been installed and grouted.  There is typically hesitation as one does not want to understandably cause additional damage to the heat wire.  DITRA-Heat wires, if snapped into the membrane correctly, are actually pretty well protected.   Wires that sustain damage during installation are outside of Schluter warranty support, and Schluter reserves the right to place the repair back on the contractor or installer.  Schluter may help locate the location of the damage, but may not be able to do the repair depending on circumstance. Repairing a wire or sesor is a pretty simple process.  Schluter Systems NA has created a Tips and Tricks video that demonstrates the locating of heat wire as well as the removal of tile over DITRA-Heat. Wire repair kits can be purchased through distribution or direct from Schluter.  Instructions are included in the repair kits. ...